
Today we will talk about deploying Magento 2 in your own Kubernetes cluster. We will use Google Cloud Platform because we use this service and have a rich experience with it .
So, let’s get started. We suggest using a ready-made solution from Bitnami, which is installed using the kubernetes package manager – Helm. This is a fairly simple method that will save you time installing and configuring the necessary components for Magento 2. Execute the commands:
helm repo add bitnami https://charts.bitnami.com/bitnami
helm install m2-demo bitnami/magento , where m2-demo is the name you selected.
After that, the necessary system components will be deployed in the cluster.
The program prompts you to follow a series of instructions, during the installation process, to complete the system configuration (Pic 1).

Pic. 1
Complete all, but the last one (Pic 2).

Pic. 2
We will change the last command to use our Docker Image, which contains Magento 2 with Custom Product Builder. We place a link to Dockerfile here . In addition, we will provide access to the result via the desired domain.
helm upgrade m2-demo bitnami/magento \
–set magentoHost=$APP_HOST,magentoPassword=$APP_PASSWORD,mariadb.db.password=$APP_DATABASE_PASSWORD,image.registry=gcr.io,image.repository=m2demo/github.com/buildateam/magento,image.tag=982b9728cff848c4920b60f6d7dea808f5d4f08f,ingress.enabled=true,ingress.hosts[0].name=m2demo.buildateam.io,ingress.certManager=true,ingress.hosts[0].tls=true,ingress.hosts[0].tlsSecret=m2demo-tls,ingress.annotations.”kubernetes\.io/ingress\.class”=”gce”,ingress.hosts[0].path=”/*”,ingress.annotations.”kubernetes\.io/ingress\.global\-static\-ip\-name”=demo-ip
image.registry – image register;
image.repository – repository of your image register;
image.tag – image tag;
ingress.hosts[0].name – name of your domain.
ingress.hosts[0].tlsSecret – Kubernetes Secret name which contains SSL certificates for your domain.
ingress.annotations.”kubernetes.io/ingress.class” – name of your Ingress Controller
ingress.annotations.”kubernetes.io/ingress.global-static-ip-name” – name of the static IP address (make sure that your domain is linked to this IP)
You can find a list of Static IP addresses in the GCP console ( Pic. 3)

Pic. 3
This command takes a long time to complete, so don’t rush any further steps. Wait 10-15 minutes and make sure that your Ingress is running successfully in the Service & Ingress section of your cluster’s GCP console (Pic. 4).
![]()
Pic. 4
Then follow the Admin URL to the admin panel (Pic. 5).
 Pic. 5
In the admin panel select Stores, then Configuration (Pic. 6).

Pic. 6
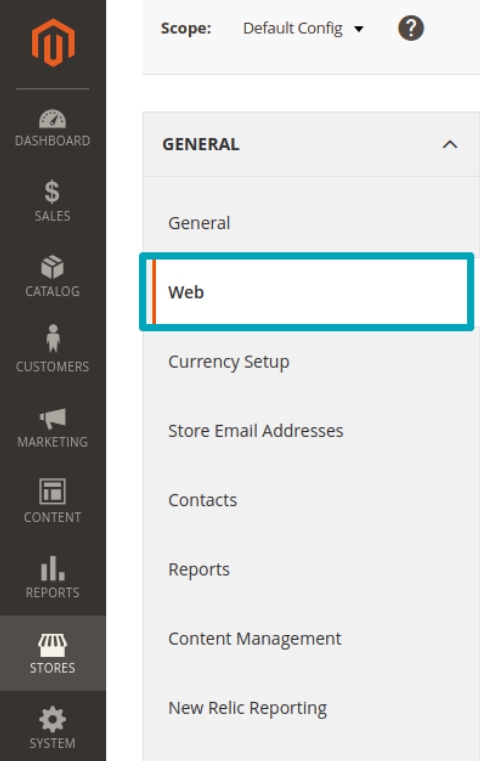
After that click GENERAL and Web (Pic. 7).

Pic. 7
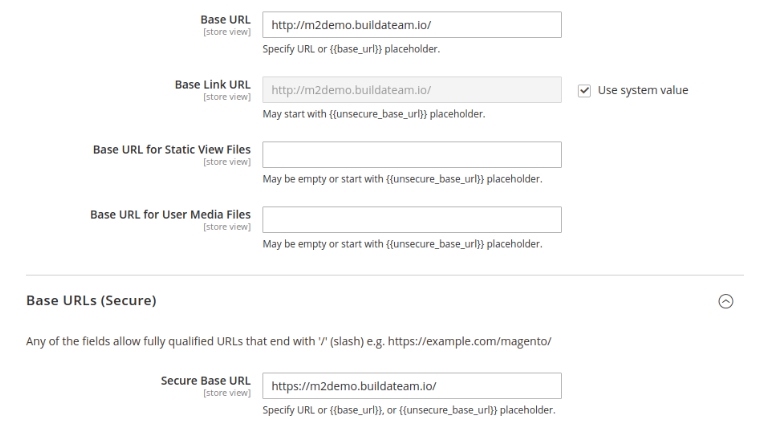
Set the values of the Base URL and Secure Base URL fields to match your domain name. In our case it looks like this (Pic. 8):

Pic. 8
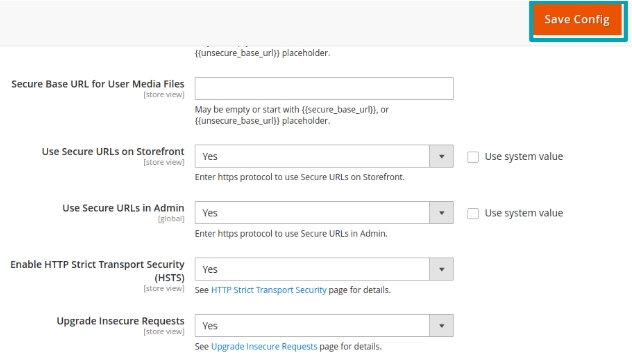
Next, set the value Yes to the fields Use Secure URLs on Storefront, Use Secure URLs in Admin, Enable HTTP Strict Transport Security (HSTS), Upgrade Insecure Requests and click to the Save Config button (Fig. 9).

Pic. 9
Congratulations, you can now go to the admin panel using your domain.
There’s not much left. Go to System => Cache Management (Pic. 10).

Pic. 10
And click to Flush Magento Cache (Pic. 11).

Pic. 11
That’s it, you’ve completed the configuration process.
Want to skip the hassle? We offer Magento Cloud Hosting.
Email us at hello@buildateam.io for an advice or a quote. Also feel free to check out Managed Magento Optimized Google Cloud Hosting

